Hi Everyone,
Welcome to my Getting Started with Cheep (4$) Cypress PSoC 4 - CY8CKIT-049 prototyping platform Series. In this post I will talk about setting up the Environment for PSoC4- CY8CKIT-049 42xx prototyping platform, getting and setting up the platform itself. From next posts onwards I will talk about getting started with programming :) . Let's begin :P
.jpg)
To understand this more clearly, let's assume you have a project where you need to configure an analog temperature sensor at pin 12 of your device. and by mistake/due to old design's you made a board in which pin 2 of your MCU was connected to temperature sensor !! :( Now, the only way you can correct the mistake is wither my manually doing the rework on the board (which is messy) or by making a new board (Lots of money gone :( !!). With PSoC you simply just have to reroute the temperature sensor signal to the appropriate pin (i.e. pin 2) and voila you are done. No hazels what so ever.
For more information on Cypress PSoC please visit:
http://www.cypress.com/psoc/?source=CY-ENG-HEADER
Cypress PSoC4 CY8CKIT-049 42xx/41xx are Cypress's Lowest cost and moderately featured DevBoards. These Boards cost about 4$ and are well suited for learning Embedded Systems, using them in one of your designs or evaluation of PSoC4 42xx/41xx SoC . These kit's are based on Cypress's PSoC4 technology, i.e. Programmable System on Chip (4 signifies the family : in this case 4 means the base MCU is ARM Cortex M0) and has everything you need to get started.
For More information about the Kit's please visit :
http://www.cypress.com/?rID=92146
1. Easy to understand and Learn : The PSoC Creator IDE has a drag and drop based interface, with easy graphical configuration of the Modules. For Example, if you want to control a GPIO , Just drag the Pin Module to the workspace and configure the module graphically.
2. Flexibility of use : As discussed previously, if you have loads of connections or wiring and you want to change one or two of them, no problem just do a Software Fix. PSoC Creator gives a pin map of the PSoC you are using, You can drag the function you have created and manually map it to the pin you want, which is really neat :P
3. Bread board Friendly : We can solder some headers and can prototype directly using breadboard.
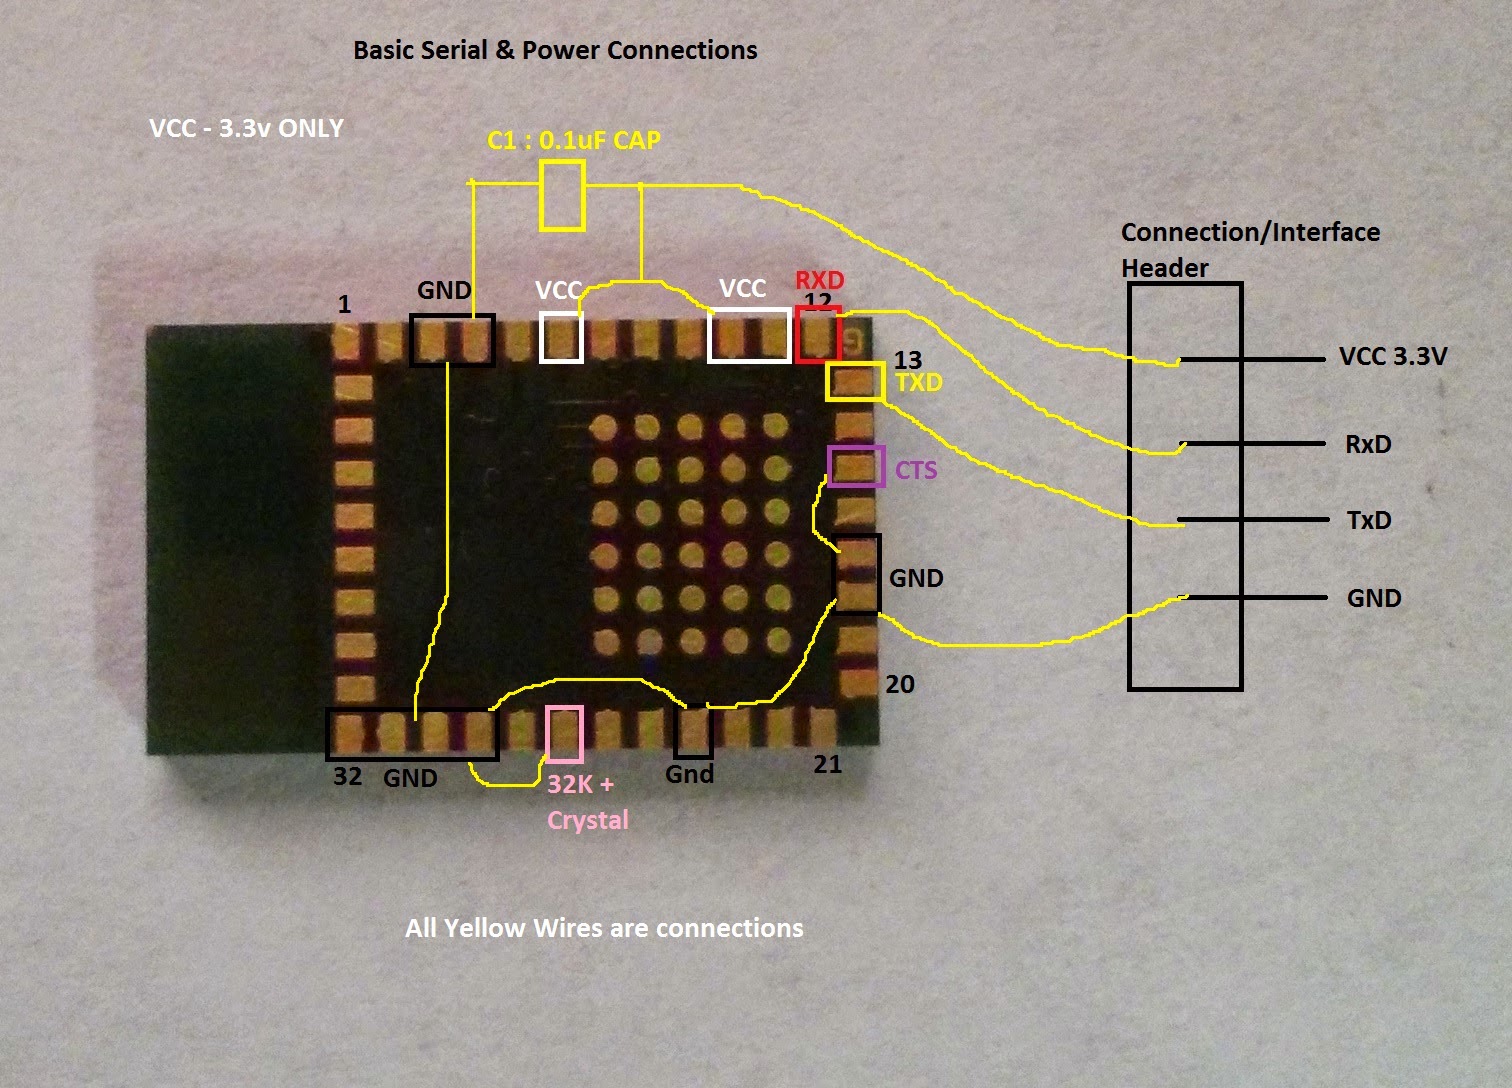
4. Free USB to UART/I2C/SPI Tool : The Cypress (CY7C6521x) USB converter on the board can do USB to UART, USB to I2C and USB to SPI :) all of that can be configured using the USB configuration tool on PC. Connections are made using the GPIO header provided on the USB to UART section of the kit.
5. Can implement Digital Logic using the on board UDB : Cypress PSoC4 42xx series of SoC has four UDB's (Universal Digital blocks) which can be reconfigured to make some digital connections. like clock divider for Blink LED Application, etc.
6. Can also do a cut down version of verilog : Another awesome feature of PSoC is, as it has the UDB's you can make use of that and implement some small hardware Glue logic to the Software you write. For this feature you can create your own custom module and try and instead of C backend you can do Verilog coding making use of the UDB's.
7. Can create your own Module Blocks : It's almost obvious that you wont always find a module for each and every sensor. Worry not, you can create you'r own custom module and share it with the community to use it.
8. No need of learning the API's as API's are auto generated for each module : A very neat feature of PSoC Creator is the API's structure and Datasheets for each API's. So if you need to use ADC in your design, you dont have to go through a 1000 pages datasheet searching for ADc and the through another 1000 page API set documentations. You can click the datasheet component and will get all the relevant information of the component right there, including all the API calls and references. Further, the API's are auto generated like "beans" in Code warrior, so if you have your LED named with "RED" in your design, you's API's will be like RED_Write(1);
Well I will leave the conclusion of the above question to you :P.
 The 4$ Dev Kit is based on Cypress CY8C4245AXI SoC, and have a User LED, Current Measurement header, Boot/User Switch, ~40 GPIO's, A usb to UART/I2C/SPI convertor with GPIO's all in a breadboard friendly Format.[Refer image above].
Ordering the Modules : You can order the Module directly from Cypress, Digikey or mouser :)
Cypress : http://www.cypress.com/?rID=92146
DigiKey : http://www.digikey.com/product-highlights/en/psoc-4-cy8ckit049-4xxx-prototyping-kits/52444
Mouser : http://www.mouser.in/new/Cypress-Semiconductor/cypress-cy8ckit-049-kits/
IMPORTANT NOTE : While ordering the Module Always order 2 or 3 modules. As these Modules work on UART Boot-loader and if you forgot to add a Boot-loader Module to the Design, you will need another kit to reprogram the previous Module.


 STEP 4 : If you want current measurement on your device : the You have to remove the 0 Ohm resistor marked in white below, and solder a 2 pin berg connector marked by Blue. To power the board always short the 2 pin connector with a standard Jumper. To measure the current drawn, disconnect the jumper and contact the positive and negative wires of multimeter to the 2 pin connector.
Now we have prepared our board's for the Journey it's will go through :P :P :P
USB SDK and config : USB-Serial SDK Windows Installer & Configuration Utility
and also download the Quick start Guides and Reference Design Files if you wish.
All in one Link : http://www.cypress.com/?rID=92146
STEP 2 : Installing the Software
Mount the iso image and install the Software, PSoC Creator, PSoC Programmer, Bootloader Tool and etc. This process may take up to 30 min, so grab a coffee :) :P. Then install the USB SDK. Then finally extract the contents of the Essential files list to c:\psoc4\cy8ckit049_42xx\, you can choose any directory you like.
and yup we are done :)
Step 3 : Unboxing of the KIT
This kit comes in a unique awesome eco friendly package with all the pin out's at the back, To unbox simply tear down the front. <Unboxing Video Coming Soon>


Step 4 : Testing that everything Works :)


Some more tests,
TEST 1 : Open the "Cypress USB configuration utility" , Connect the Board (go-through the windows driver installer first time) , Click "Select target" option and click "connect". If you get the device details, i.e. you are able to see a new tab next to the Select Target tab that means the device is working fine.
TEST 2 : Dumping the Example code : Open PSoC Creator Software then you have to open the Bootloader Host Tool,
PSoC Creator -> File Menu ->Tool -> Bootloader Host
once done that browse c:\psoc4\cy8ckit049_42xx\CY8CKIT-049-42xx PSoC4 Proto kit\SCB_Bootloader_42xx\Bootloadable Blinking LED.cydsn\CortexM0\ARM_GCC_473\Debug\Bootloadable Blinking LED.cyacd file in the "FILE" dialog, Select the appropriate Kit in the "PORTS" view , make sure that the baud is set to 115200 and then hit the "Program" button (next to the File button). You will see the status bar going and within seconds you can see the LED on your board blinking. This means that all set to Go. :D
Gurinder Singh Gill
technervers.com
Welcome to my Getting Started with Cheep (4$) Cypress PSoC 4 - CY8CKIT-049 prototyping platform Series. In this post I will talk about setting up the Environment for PSoC4- CY8CKIT-049 42xx prototyping platform, getting and setting up the platform itself. From next posts onwards I will talk about getting started with programming :) . Let's begin :P
1. Introduction
1.1. What is the Cypress PSoC 4 ?
The simplest answer is that PSoC is a programmable system on chip i.e. you can think of it as a mixture of microcontroller, FPGA and configurable analog :). That simply means that you now have the ability to configure the design to the hardware level (somewhat !) and as with other MCU's you can anyways continue with the software configuration.To understand this more clearly, let's assume you have a project where you need to configure an analog temperature sensor at pin 12 of your device. and by mistake/due to old design's you made a board in which pin 2 of your MCU was connected to temperature sensor !! :( Now, the only way you can correct the mistake is wither my manually doing the rework on the board (which is messy) or by making a new board (Lots of money gone :( !!). With PSoC you simply just have to reroute the temperature sensor signal to the appropriate pin (i.e. pin 2) and voila you are done. No hazels what so ever.
For more information on Cypress PSoC please visit:
http://www.cypress.com/psoc/?source=CY-ENG-HEADER
1.2. What is PSoC4 Prototyping board ?
Cypress PSoC4 CY8CKIT-049 42xx/41xx are Cypress's Lowest cost and moderately featured DevBoards. These Boards cost about 4$ and are well suited for learning Embedded Systems, using them in one of your designs or evaluation of PSoC4 42xx/41xx SoC . These kit's are based on Cypress's PSoC4 technology, i.e. Programmable System on Chip (4 signifies the family : in this case 4 means the base MCU is ARM Cortex M0) and has everything you need to get started.
For More information about the Kit's please visit :
http://www.cypress.com/?rID=92146
1.3. Why is it good for beginners, hobbyist, Makers and educators?
There are couple of reasons why I would prefer these kits for beginners, hobbyist, makers and educators.1. Easy to understand and Learn : The PSoC Creator IDE has a drag and drop based interface, with easy graphical configuration of the Modules. For Example, if you want to control a GPIO , Just drag the Pin Module to the workspace and configure the module graphically.
2. Flexibility of use : As discussed previously, if you have loads of connections or wiring and you want to change one or two of them, no problem just do a Software Fix. PSoC Creator gives a pin map of the PSoC you are using, You can drag the function you have created and manually map it to the pin you want, which is really neat :P
3. Bread board Friendly : We can solder some headers and can prototype directly using breadboard.
4. Free USB to UART/I2C/SPI Tool : The Cypress (CY7C6521x) USB converter on the board can do USB to UART, USB to I2C and USB to SPI :) all of that can be configured using the USB configuration tool on PC. Connections are made using the GPIO header provided on the USB to UART section of the kit.
5. Can implement Digital Logic using the on board UDB : Cypress PSoC4 42xx series of SoC has four UDB's (Universal Digital blocks) which can be reconfigured to make some digital connections. like clock divider for Blink LED Application, etc.
6. Can also do a cut down version of verilog : Another awesome feature of PSoC is, as it has the UDB's you can make use of that and implement some small hardware Glue logic to the Software you write. For this feature you can create your own custom module and try and instead of C backend you can do Verilog coding making use of the UDB's.
7. Can create your own Module Blocks : It's almost obvious that you wont always find a module for each and every sensor. Worry not, you can create you'r own custom module and share it with the community to use it.
8. No need of learning the API's as API's are auto generated for each module : A very neat feature of PSoC Creator is the API's structure and Datasheets for each API's. So if you need to use ADC in your design, you dont have to go through a 1000 pages datasheet searching for ADc and the through another 1000 page API set documentations. You can click the datasheet component and will get all the relevant information of the component right there, including all the API calls and references. Further, the API's are auto generated like "beans" in Code warrior, so if you have your LED named with "RED" in your design, you's API's will be like RED_Write(1);
Well I will leave the conclusion of the above question to you :P.
2. The Board
Ordering the Modules : You can order the Module directly from Cypress, Digikey or mouser :)
Cypress : http://www.cypress.com/?rID=92146
DigiKey : http://www.digikey.com/product-highlights/en/psoc-4-cy8ckit049-4xxx-prototyping-kits/52444
Mouser : http://www.mouser.in/new/Cypress-Semiconductor/cypress-cy8ckit-049-kits/
IMPORTANT NOTE : While ordering the Module Always order 2 or 3 modules. As these Modules work on UART Boot-loader and if you forgot to add a Boot-loader Module to the Design, you will need another kit to reprogram the previous Module.
2.1. Preparing the Board
For preparing the board you need couple of things,
1. Soldering Station
2. Flux and Soldering Lead
3. Long/ Short berg strip's 0.1" spacing (Standard headers) 22pins(2 nos.), 17pins(2 nos.), 7pins(4 nos.), 2pins(2nos.)
4. 90 Dig angled berg strip 0.1" spacing (Standard angled headers) 5pins(2nos.)
5. the Boards obviously ;) (2nos.)
STEP 1 : If you have a long berg strip, you have to break them into the above mentioned configuration (22pins, 17pins, 7pins, 5pins(angled) )
STEP 2 : If you have standard Headers solder them as shown in the picture below:
I usually like to plug the board on to bread board and try to use both the Breadboard as well as the Pins for connecting me External components. So, If I want a pullup resistor, I use the breadboard but for an external module interface I try and use the pins directly :) ;)
So, To do that Follow the Steps Below :)
STEP 2.1 : Insert the berg connectors opposite ways into the board as shown in the pic below.
STEP 2.2 : Solder the Berg Connectors on the board and, Remove the separator from the berg connectors as in the pic below.
STEP 2.3 : Insert the separator towards the Bottom of the PCB, with the notch towards the PCB. (As shown in the Pic above - the black part).
STEP 3 : If you want to use the USB to UART separately, then break the USB to UART section of the board from the body and solder 4pin berg connector 0.1" (standard/angled headers) on ether sides of the boards and you are done. Reference Images below,
 -
-Now we have prepared our board's for the Journey it's will go through :P :P :P
3. Installing the Software
We will go through the steps of installing the new software for the Kit. This kit is only supported on windows.
STEP 1 : Downloading the Files
Download all the necessary files from cypress servers :
Cypress PSoC Creator :
CY8CKIT-049-42xx CD ISO (Creator CD) (For 42xx boards)
CY8CKIT-049-41xx CD ISO (Creator CD) (For 41xx boards)
Some Essential files : CY8CKIT-049-42xx Kit Only (Kit Design Files, Documentation, Examples)
CY8CKIT-049-41xx Kit Only (Kit Design Files, Documentation, Examples)USB SDK and config : USB-Serial SDK Windows Installer & Configuration Utility
and also download the Quick start Guides and Reference Design Files if you wish.
All in one Link : http://www.cypress.com/?rID=92146
STEP 2 : Installing the Software
Mount the iso image and install the Software, PSoC Creator, PSoC Programmer, Bootloader Tool and etc. This process may take up to 30 min, so grab a coffee :) :P. Then install the USB SDK. Then finally extract the contents of the Essential files list to c:\psoc4\cy8ckit049_42xx\, you can choose any directory you like.
and yup we are done :)
Step 3 : Unboxing of the KIT
This kit comes in a unique awesome eco friendly package with all the pin out's at the back, To unbox simply tear down the front. <Unboxing Video Coming Soon>
[Images are taken from Internet, Will upload my own Soon]
The most easy step :) Connect the board to a computer's USB port/ Power bank and check the LED's Going off.
Some more tests,
TEST 1 : Open the "Cypress USB configuration utility" , Connect the Board (go-through the windows driver installer first time) , Click "Select target" option and click "connect". If you get the device details, i.e. you are able to see a new tab next to the Select Target tab that means the device is working fine.
TEST 2 : Dumping the Example code : Open PSoC Creator Software then you have to open the Bootloader Host Tool,
PSoC Creator -> File Menu ->Tool -> Bootloader Host
once done that browse c:\psoc4\cy8ckit049_42xx\CY8CKIT-049-42xx PSoC4 Proto kit\SCB_Bootloader_42xx\Bootloadable Blinking LED.cydsn\CortexM0\ARM_GCC_473\Debug\Bootloadable Blinking LED.cyacd file in the "FILE" dialog, Select the appropriate Kit in the "PORTS" view , make sure that the baud is set to 115200 and then hit the "Program" button (next to the File button). You will see the status bar going and within seconds you can see the LED on your board blinking. This means that all set to Go. :D
FUN StuFF
Fade Example using the on board LED on the Board :PGurinder Singh Gill
technervers.com