Sunday, December 25, 2016

CHRISTMS SPECIAL : Linkit Smart 7688 Duo Wireless Storage


Hello Folks,

First of all Wishing you Merry Christmas and a Happy New Year. I am finally Restarting the blog I started few years ago, and what's more fun than getting rid of storage devices occupying my damn USB ports ( @all MAC users You know What I mean ;-) )!!

So,  Lets get started. 

Now there are many wireless storage devices like these that costed me about 3K INR !! hey but where is the fun of learning there ?
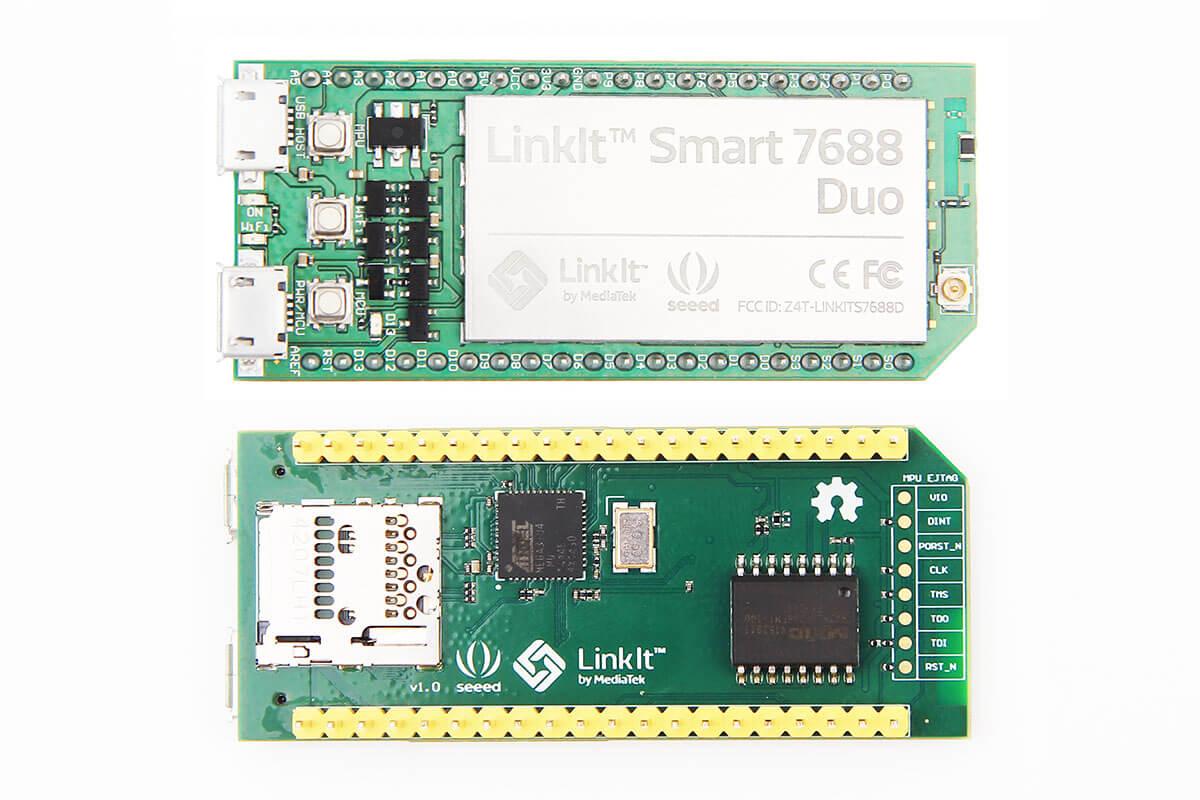
So, I went with buying a Linkit Smart 7688 Duo Board that costed me about 1.6K INR and as I already had a 64 GB Memory card laying around; Why not build something like this using
Linkit Smart?


1.  Introduction 

     Linkit Smart 788 Duo is a Small development platform based on OpenWRT, i.e. the same tiny footprint linux based OS running on your routers, Arduino Yun (now changed to Linino OS), and many other development platform. Below listed is some technical data for NErDS!!

      So, basically this board is a tiny computer running tiny version of Linux which comes in a tiny box :).

2.  BASIC CONFIGURATION

Well next I wanted to get an SD card and mount it on the device; Obviously a 32 MB flash wont even hold anything  :( . So we get our mighty 64 GB Memory card laying around and insert it. :D That was easy :)

Ohh boy,; But how to access the card or the device ?

For now just follow the steps, we will cover the later in detail :)
Step1 : Connect Linkit Smart (Left most usb with pwr/mcu label) to power adapter (5v at least 500mA). Ensure green light turning on. The orange light will glow once and then will glow again for about 10 sec before blinking.
Step2 : Connect to the Wirless network created by linkit one something like this LinkIt_Smart_7688_XXXX.
Step3 : Open a web browser and type  http://mylinkit.local/
Step4 : The web page will ask you to setup a new password for root. Do that and login on to the page.
Step5 : Find "Current IP Address" tab and note down your IP address.
Step6 : Open your terminal and type
             ssh root@<IP_ADDR> (Replace <IP_ADDR> with IP address )
t will ask you to enter your password. Enter that and you are in :)

Now that the card is in , We need to mount the card; well before that I thought, why cant we boot the entire system from the memory card itself ?? Why to boot from 32 MB raw flash that seems to have a limited write cycles ? So a little googling fetched me this

This is an essential step as you are now booting the device from the SD card. Don't worry if you are not able to understand this just copy paste the commands given in the above link and you are good to go

3. CREATING NETWORK SHARES


Well now that we have our base ready, all we have to do is sharing a folder that we can access from anywhere. We will do this using openWRT console. 

STEP 1 :  Create a folder to share. Type the following on your terminal
                 cd /root
                 mkdir AirDrive
                 chmod o+rwx /root/AirDrive
                 chown nobody /root/AirDrive/

STEP 2 :
Open a web browser and type  http://mylinkit.local/ ;Clicko Go to OpenWrt

STEP 3 : Login using username root and your password.


STEP 4 : Click on the Services tab.


STEP 5 : Click Network Shares tab. and replicate the contents as given in the image.

Click Save and Apply and you are ready to go :).

STEP 6 : Now Open File Explorer/ Finder  browse to network and you will be able to see "AirDrive". on opening use Guest login and enjoy your own Wireless Pendrive. 

Hope you liked the project :) 

PS : Just for fun I am using the Cute tiny box it came in as its cover  :)


REFERRENCES

1.  Seeed Studio Product Page
2.  Seeed Studio Wiki Page
3.  Fab.to.Lab Product Page (To buy in INDIA)
4.  H/W Schematic Files
5.  Mediatek Labs Page
6.  Mediatek Getting Started Guide
 

Friday, September 23, 2016

1Shield - Review. Something worth playing with :)

ONE SHIELD.


Hey Guys, I finally got hold of 1Shield[*1] a generic Arduino Shield that useses your Mobile as your Arduino Shield.
--:: Hmmm What !!!??? ::--
Lets take a step back, you recal all those messy add-on modules/ shields .. .. .. and endlessly trying all you can to find those extra I/O Ports/Pins to get your module to work with arduino .. Well now BOOOMMMmmm.. just 1Shield to do it all.

So how does it work?


So the concept is pretty simple the shield itself has Arduino compatable microcontroller (Atmega16u2 running 1Shield firmware) connected to a Bluetooth Module that connects to your Mobile phone. Similary Your mobile phone has a 1Shield application that emulates various Arduino Shields as well as talk to the board using Bluetooth 2.0(They claim to be using HC-06 Bluetooth Module).
I will be doing a getting starting with this kit, where I would be explaining things like H/W and S/W in more detail.


How can it be helpful?

Well,
  • No need of Tons of various Shields.
  • No Power worries.
  • Easy to set up and use. (Common you just have to plug the field in. I mean Daa... 😒)
  • Use of advance sensors (Present on your Mobile) Very Easily !!
  • Biggest one is NO WIRES !! DOT (.) !!

Things I like about 1Shield.

Ok to make things simpler and quicker :
  • Easy to Setup Both H/W and S/W wise.
  • It does anything you can think about (Almost :P )
  • No need of beefy Expensive sensors.
  • A Huge Plus if you need to save some Battery.
  • You dont need a huge bunch of Wires, Cables, mess, mess and more mess with you all the time :D.
  • Works on UART so Voila you can use anything below the Shield(Though It really loves Arduino) or even use it stand alone with some other development platform.

Things that I don’t like

Hmmm… Its Hard .. Let Me think .. Ahh Haaaa :
  • Runs Bluetooth 2.0 So Yeeahh, none of the BLE/BT4.0+ Goodies.
  • Shares the Same Uart as the arduino’s Programming Port, So, you need to keep that in mind while programming your arduino. (Thankfully they have given a disconnect/connect UART toggle switch on the board)
  • Can connect/pair to only one mobile device at a time. 
  • Requires a Co-Processing/ Controlling board dispite having an on board MCU ;-<.

Initial Setting up?

STEP 2 : download the Arduino Library — http://1sheeld.com/login/?redirect_to=http://1sheeld.com/downloads/ [You require to create a new free account with 1Shield before downloading]
STEP 3 : Copy the contents of the library to your Arduino/Libraries
STEP 4 : Fire up Arduino IDE; Load the Example App

Conclusion and final verdict - Do I need it or Just say WoW !! ?

So, Like me if you are into heavy prototyping, Checking or testing an Idea , or are into giving a POC ; Guess what JUST BUY THE DAMN THING. It would save you a huge amount of Money, Time and Effort.
But, If you are into RTOS, Very Low Latency Systems, Deployment of project, Some Jazzy Colour LCD stuff ; I would defenitely not recommend this device. and you could just say Meehhhh :P.
<GurI>gsgill112@gmail.com
## I will defenitely do a getting started Blog on this board in near future {Jeeze Work, Work Work .. ... ..  :’( } time. So, Stay Tuned.

*1. [A Ton Of Thanks to some amazing Folks at Hackster.IO for sending me this Amazing piece of hardware - Please visit http://hackster.io/ for amazing DIY projects and share your projects to win some amazing hardware kits http://hackster.io/store ]